Project
This page is for dlt+, which requires a license. Join our early access program for a trial license.
dlt+ Project provides a structured and opinionated approach to organizing data workflows while implementing best practices for data engineering teams. dlt+ Project automates key processes such as data loading, data transformations, data catalogs, and data governance, and enables different members of the data teams to work more easily with each other.
With dlt+ Project, you can efficiently manage your data workflows by:
- Using a declarative
dlt.ymlfile to define sources, destinations, pipelines, and transformations. - Configuring different profiles for various use cases and environments.
- Ensuring data quality by defining tests with dlt+ tests utils.
- Packaging your project as a Python package and distributing it via PyPI or a git repository [Coming Soon!]
This structured approach allows teams to work efficiently while maintaining flexibility and control over their data workflows.
Project structure
A dlt+ Project has the following general structure:
├── .dlt/                 # folder containing dlt configurations and profile settings
│   ├── config.toml
│   ├── dev.secrets.toml  # credentials for access profile 'dev'
│   └── secrets.toml
├── _data/                # local storage for your project, excluded from git
├── sources/              # modules containing the source code for sources
│   └── github.py         # source code for a GitHub source
├── transformations/      # modules containing the source code for transformations
├── .gitignore
└── dlt.yml               # the main project manifest
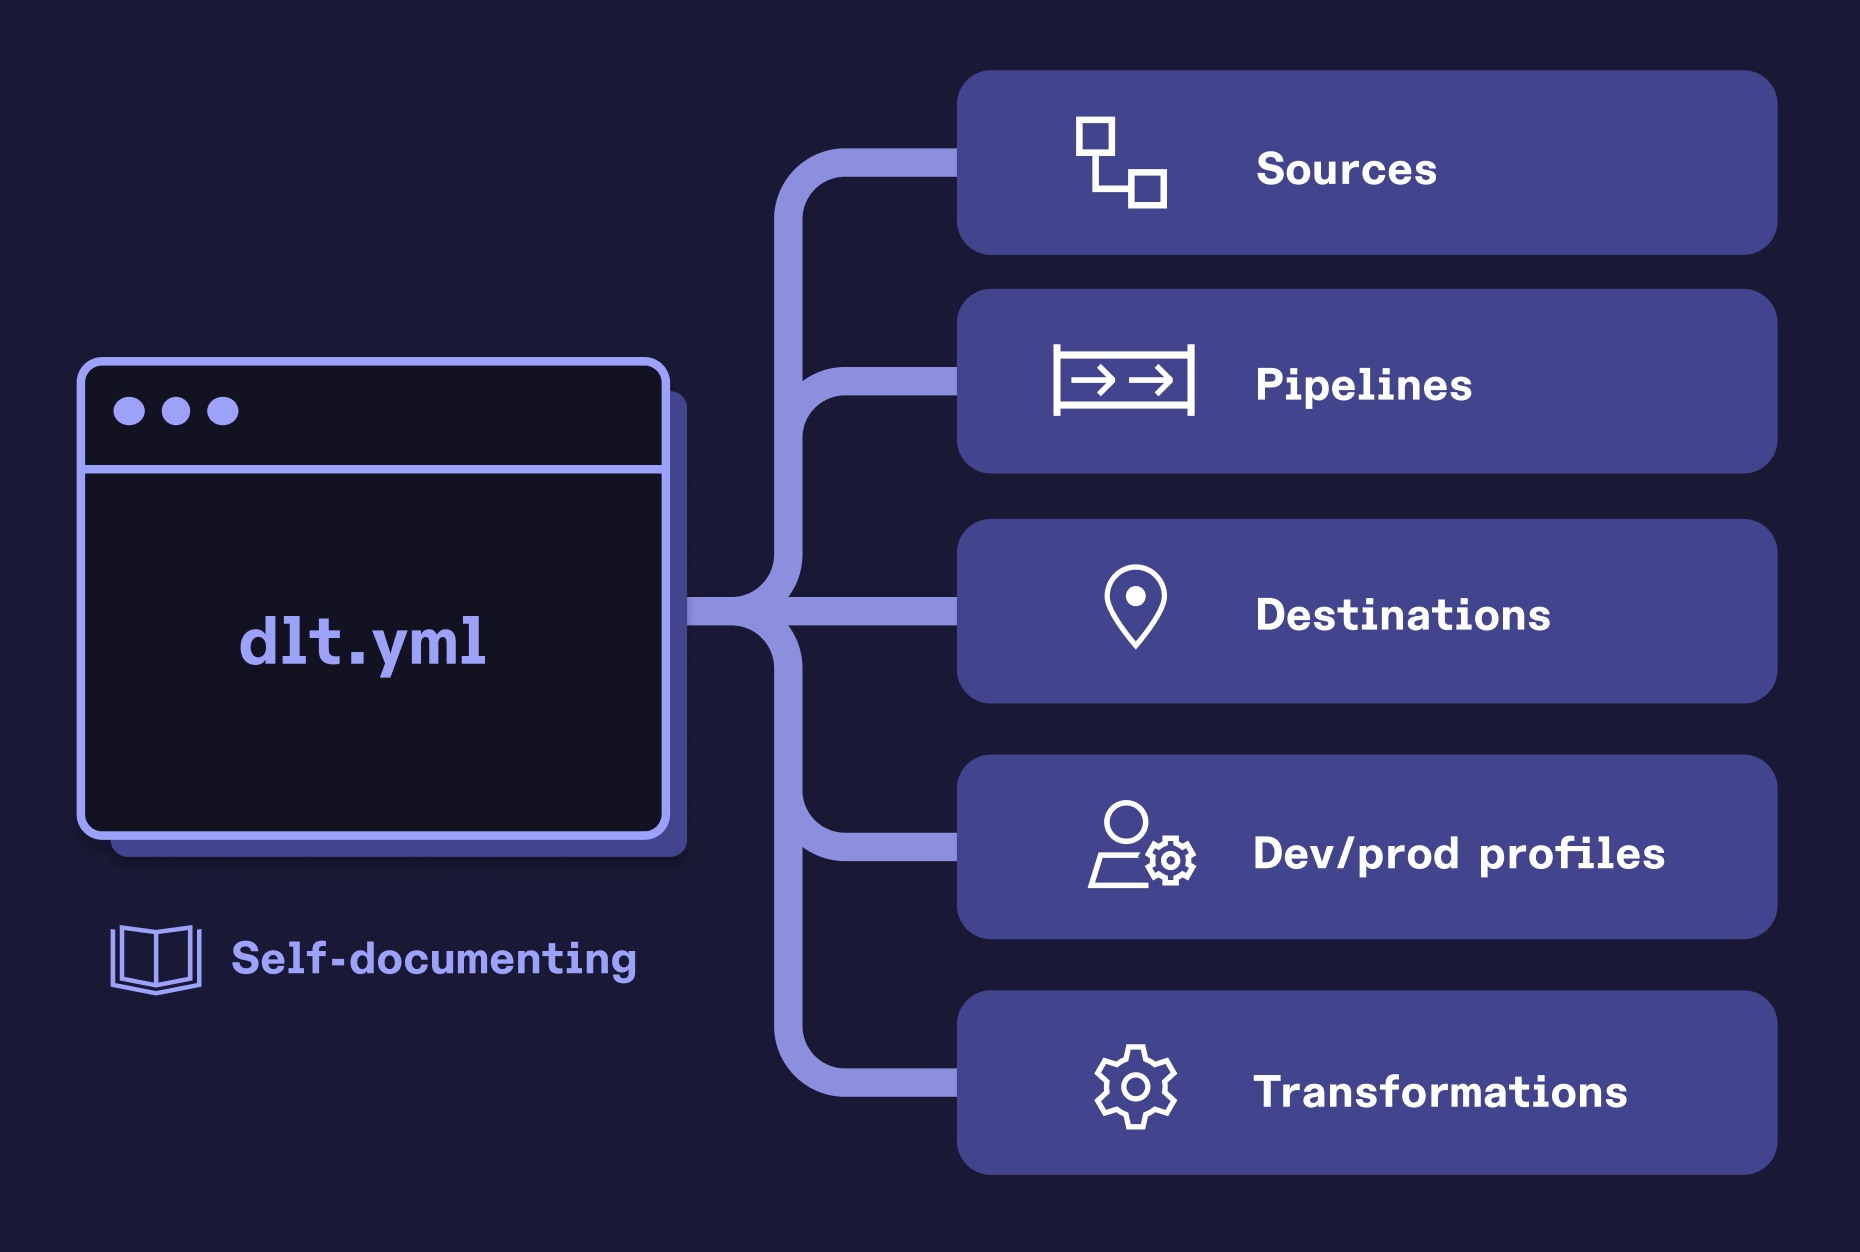
The dlt manifest file (dlt.yml)
The main component of a dlt+ Project is the dlt manifest file (dlt.yml). It marks the root of your project and contains the main configurations. Here you can declare all of your data platform entities in a YAML format. It contains the following sections:
Sources
This section lets you define sources either declaratively or by referencing an implementation from a Python module inside sources/. In the example below, two sources are declared:
- a GitHub source defined in a function
sourcewhose source code insidesources/github.pyis referenced - a dlt REST API source whose parameters are passed within the manifest
sources:
  github:
    type: github.github_reactions

  pokemon_api:
    type: rest_api
    client:
      base_url: https://pokeapi.co/api/v2/
      paginator: auto

    resources:
      - name: pokemon
        primary_key: name
      - name: berry
        primary_key: name
      - name: encounter_conditions
        primary_key: name
        endpoint:
          path: encounter-condition
          params:
            offset:
              type: incremental
              cursor_path: name
        write_disposition: append
type: rest_apispecifies the use of the built-in REST API source.client.base_urlsets the root URL for all API requests.paginator: autoenables automatic detection and handling of pagination.resource_defaults: Contains the default values to configure the dlt resources. This configuration is applied to all resources unless overridden by the resource-specific configuration.- Each item in
resourcesdefines an endpoint to extract. Simple entries likepokemonandberrywill fetch from/pokemonand/berry, respectively. - The
encounter-conditionresource uses an advanced configuration:path: Point to the/encounter-conditionendpoint.params.offset: Enables incremental loading using thenamefield as the cursor.write_disposition: append ensures new data is appended rather than overwriting previous loads.
This setup provides a flexible, zero-code way to work with REST APIs and manage data extraction across multiple endpoints in a single source block.
Source type is used to refer to the location in Python code where the @dlt.source decorated function is present. You can
always use a full path to a function name in a Python module, but we also support shorthand and relative notations. For example:
rest_apiwill be expanded todlt.sources.rest_api.rest_apiwheredlt.sources.rest_apiis a Python module in OSS dlt andrest_apiis a name of a function in that module.github.sourcewill be expanded tosources.github.sourcesin the current project.
If the type cannot be resolved, dlt+ will provide you with a detailed list of all candidate types that were looked up so you can make required corrections.
Destinations
The destinations section defines dlt destinations in a similar way to how you would define them in a pure Python dlt project. As with sources, you can also create a destinations/ folder and reference custom implementations of destinations inside it.
destinations:
    duckdb:
        type: duckdb
Pipelines
Pipelines can be used to load data from sources to destinations. The pipeline defined below loads data from the GitHub source to a dataset named "github_events_dataset" inside the duckdb destination.
github_pipeline:
  source: github
  destination: duckdb
  dataset_name: github_events_dataset
You can declare all arguments of dlt.pipeline in this section. For a full list of arguments, refer to the docstrings.
Datasets
The datasets section defines datasets that live on a destination (defined in the destinations section). Any datasets declared in the pipeline section are automatically created if not declared here. Read more about datasets in dlt+ here.
datasets:
  github_events_dataset:
    destination:
      - duckdb
Cache 🧪
In this section, you specify the input table(s) that you want to transform, and the output table(s) that you want to write after performing the transformations. The example below loads the table "events" from the destination dataset "github_events_dataset" into a local cache, then transforms it using the transformations inside the transformations/ folder, and finally writes two tables back into the dataset "github_events_dataset": the original "events" table, and the transformed "events_aggregated" table. Read more about how local cache is used for transformations here.
The cache feature is currently limited to specific use cases and is only compatible with data stored in filesystem-based destinations. Please make sure that the input dataset for the cache is located in the filesystem-based destination (Iceberg, Delta, or Cloud storage and filesystem).
caches:
  github_events_cache:
    inputs:
      - dataset: github_events_dataset
        tables:
          events: events
    outputs:
      - dataset: github_events_dataset
        tables:
          events: events
          events_aggregated: events_aggregated
🚧 This feature is under development. Interested in becoming an early tester? Join dlt+ early access
Transformations 🧪
Here you specify the settings for your transformations. In the code example, we define an arrow-based transformation that will operate on the cache "github_events_cache". It will make use of code in the transformations/ folder. Read more about how transformations are done here.
transformations:
  github_events_transformations:
    engine: arrow
    cache: github_events_cache
🚧 This feature is under development. Interested in becoming an early tester? Join dlt+ early access
Profiles
You can use the profiles section to define different environments (example: dev, staging, prod, tests). One package may have multiple profiles which can be specified using dlt+ cli commands. The default profile name is dev. It's created automatically alongside the tests profile.
profiles:
  dev: # Using "dev" profile will write to local filesystem
    destinations:
      delta_lake:
        type: delta
        bucket_url: delta_lake
  prod: # Using "prod" profile will write to s3 bucket
    destinations:
      delta_lake:
        type: delta
        bucket_url: s3://dlt-ci-test-bucket/dlt_example_project/
Run Configurations
For each pipeline, you can use the run_config section to define what happens when the pipeline is run from
the command line with dlt pipeline <pipeline_name> run.
pipelines:
  my_pipeline:
    source: my_source
    destination: duckdb
    dataset_name: my_dataset
    run_config:
      run_from_clean_folder: true
      store_trace_info: true
      retry_policy:
        type: fixed
        max_attempts: 3
      retry_pipeline_steps: ["load"]
Read more about these options here.
Project settings and variable substitution
You can override default project settings using the project section:
project_dir- the root directory of the project, i.e., the directory where the project Python modules are stored.data_dirandlocal_dir- files created by pipelines and destinations, separated by the current profile name.name- the name of the project.default_profile- the name of the default profile, which can be configured in the project section as seen above.allow_undefined_entities- by default, dlt+ will create entities like destinations, sources, and datasets ad hoc. This flag disables such behavior.
In the example below:
project:
  name: test_project
  data_dir: "{env.DLT_DATA_DIR}/{current_profile}"
  allow_undefined_entities: false
  default_profile: tests
  local_dir: "{data_dir}/local"
- We set the project name to
test_project, overriding the default (which is the name of the parent folder). - We set
data_dirto the value of the environment variableDLT_DATA_DIRand separate it by the profile namecurrent_profile. - We prevent any undefined entities (
allow_undefined_entities) from being created (i.e., datasets or destinations). - We set the default profile name to
tests. - We set the
local_dirto a folderlocalin thedata_dirwe defined above.
As you may guess from the example above, you can use Python-style formatters to substitute variables:
- You can reference environment variables using the
{env.ENV_VARIABLE_NAME}syntax. - Any of the project settings can be substituted as well.
Implicit entities
By default, dlt+ will automatically create entities such as datasets or destinations when they are requested by the user or the executed code.
For example, a minimal dlt.yml configuration might look like this:
sources:
  arrow:
    type: sources.arrow.source

destinations:
  duckdb:
    type: duckdb

pipelines:
  my_pipeline:
    source: arrow
    destination: duckdb
    dataset_name: my_pipeline_dataset
Running the following command executes the pipeline:
dlt pipeline my_pipeline run
In this case, the my_pipeline_dataset dataset is not declared explicitly, so dlt+ creates it automatically. The duckdb destination and the arrow source are explicitly defined, so they do not need to be created implicitly. However, if any entity (such as a source or destination) is referenced only in the pipeline and not defined under the corresponding section, dlt+ will create it implicitly.
Implicit creation of entities can be controlled using the allow_undefined_entities setting in the project configuration:
project:
  allow_undefined_entities: false
If allow_undefined_entities is set to false, dlt+ will no longer create missing entities automatically.
Datasets and destinations must be declared explicitly in the dlt.yml file:
datasets:
  my_pipeline_dataset:
    destination:
        - duckdb
Managing datasets and destinations
When datasets are explicitly declared in the dlt.yml file, the destination field must list all destinations where the dataset is allowed to be materialized. This applies even if allow_undefined_entities is set to true.
Each pipeline that references a dataset must use a destination that is included in the dataset’s destination list. If the pipeline specifies a destination not listed, dlt+ will raise a configuration error.
datasets:
  my_pipeline_dataset:
    destination:
      - duckdb
      - bigquery
In this case, pipelines using either duckdb or bigquery as a destination can safely reference my_pipeline_dataset.
The destination field is an array, allowing you to specify one or more destinations where the dataset can be materialized.
Other settings
dlt.yml is a dlt config provider, and you can use it in the same way you use config.toml.
For example, you can configure the log level:
runtime:
  log_level: WARNING
or any of the settings we mention in the performance chapter.
Local and temporary files (data_dir)
The dlt+ project has a dedicated location (data_dir), where all working files are stored. By default, it is the _data folder in the root of the project.
Working files for each profile are stored separately. For example, files for the dev profile are stored in _data/dev.
Working files include:
- Pipeline working directory (
{data_dir}/pipelinesfolder) where load packages, pipeline state, and schemas are stored locally. - All files created by destinations (
{data_dir}/local) i.e., localfilesystembuckets, duckdb databases, iceberg, and delta lakes (if configured for the local filesystem). - Default locations for ad hoc (i.e., dbt related) Python virtual environments.
Use relative paths when configuring destinations that generate local files to ensure they are automatically placed in the profile-separated
{data_dir}/local folder. For example:
destinations:
  iceberg:
    bucket_url: lake
  my_duckdb:
    type: duckdb
The iceberg destination will create an iceberg lake in the _data/dev/local/lake folder, and duckdb will create a database in
_data/dev/local/my_duckdb.duckdb.
You can clean up your working files with the dlt project --profile name clean command.
Python API to interact with dlt-plus project
You can access any dlt+ project entity or function via the Python interface. The current module provides access to various parts of your active dlt+ project.
Import statement:
from dlt_plus import current
Available methods:
current.project()- Retrieves the project configurationcurrent.entities()- Returns a factory with all instantiated entitiescurrent.catalog()- Provides access to all defined datasets in the catalogcurrent.runner()- Allows you to run pipelines programmatically
If you packaged your dlt+ Project into a pip-installable package, you can access all methods above directly from the package. For example:
import my_dlt_package

my_dlt_package.catalog()
Learn more about how to package your project.
Accessing project settings
Here are a few examples of what you can access from the project object:
from dlt_plus import current

# show the currently active profile
print(current.project().current_profile)
# show the main project dir
print(current.project().project_dir)
# show the project config
print(current.project().config)
# list explicitly defined datasets (also works with destinations, sources, pipelines, etc.)
print(current.project().datasets)
Accessing entities
Accessing entities in code works the same way as when referencing them in the dlt.yml file.
If allowed, implicit entities will be created and returned automatically. If not, an error will be raised.
import dlt_plus
from dlt_plus import current

entities = dlt_plus.current.entities()
pipeline = entities.get_pipeline("my_pipeline")
destination = entities.get_destination("duckdb")
transformation = entities.get_transformation("stressed_transformation")
Here, we access the entities manager, which allows you to create sources, destinations, pipelines, and other objects.
Running pipelines
dlt+ includes a project runner which will instantiate pipelines from the dlt.yml file
and run them with the pipeline runner, which is exactly the same as using the pipeline run command of the CLI.
You can also use it directly in your code through the project context:
from dlt_plus import current

# get the runner
runner = current.runner()
# run the "my_pipeline" pipeline from the currently active project
runner.run_pipeline("my_pipeline")
Accessing the catalog
The catalog allows you to access all explicitly defined datasets:
from dlt_plus import current

# Get a dataset instance pointing to the default destination (first in dataset destinations list) and access data inside of it
# Note: The dataset must already exist physically for this to work
dataset = current.catalog().dataset("my_pipeline_dataset")
# Get the row counts of all tables in the dataset as a dataframe
print(dataset.row_counts().df())
Learn more about the available data access methods in dlt datasets by reading the Python loaded data access guide. It covers how to browse, filter tables, and retrieve data in various formats.
Writing data back to the catalog
You can also write data to datasets in the dlt+ catalog. Each dataset has a .save() method that lets you write data back to it.
In the future, you'll be able to control which datasets are writable using contracts.
Under the hood, dlt+ runs an ad-hoc pipeline to handle the write operation.
Writing data to the catalog is an experimental feature. Use it with caution until it's fully stable.
import pandas as pd
from dlt_plus import current

# Get a dataset from the catalog (it must already exist and be defined in dlt.yml)
dataset = current.catalog().dataset("my_pipeline_dataset")
# Write a DataFrame to the "my_table" table in the dataset
dataset.save(pd.DataFrame({"name": ["John", "Jane", "Jim"], "age": [30, 25, 35]}), table_name="my_table")
You can also read from an existing table and write the data to a new table, either in the same or another dataset:
from dlt_plus import current

# Get dataset from the catalog
dataset = current.catalog().dataset("my_pipeline_dataset")

# This function reads data in chunks from an existing table and yields each chunk
def transform_frames():
    # Read the 'items' table in chunks of 1000 rows
    for df in dataset.items.iter_df(chunk_size=1000):
        # You can process the data here if needed
        yield df

# Write the data to a new table called "my_new_table"
dataset.save(transform_frames, table_name="my_new_table")
Switching profiles in code
By default, when you access the project in code, it uses the default or pinned profile.
You can switch to a different profile using the switch_profile function.
Here’s an example:
from dlt_plus import current
from dlt_plus.project.run_context import switch_profile

if __name__ == "__main__":
    # Shows the current active profile
    print(current.project().current_profile)
    # Switch to the tests profile
    switch_profile("tests")
    # Now "tests" is the active profile, merged with the project config
    print(current.project().current_profile)
Config and secrets
As shown above, it is possible to pass additional dlt settings and configurations in the manifest file itself. However, existing dlt config providers are also supported as usual, like:
- Environ provider
.dlt/config.tomlprovider, including the global config.dlt/<profile_name>.secrets.toml, which is the secrets toml provider but scoped to a particular profile. A per-profile version (dev.secrets.toml) is sought instead of thesecrets.tomlfile.
Based on the information about precedence in the configuration docs, the yaml files provide the lowest precedence of all providers just above the default values for a config value. Settings in the yaml file will therefore be overridden by toml and env variables if present.
Project context
The dlt.yml marks the root of a project. Projects can also be nested. If you run any dlt project CLI command, dlt will search for the project root in the filesystem tree starting from the current working directory and run all operations on the found project. So, if your dlt.yml is in the tutorial folder, you can run dlt pipeline my_pipeline run from this folder or any subfolder, and it will run the pipeline on the tutorial project.
Packaging and distributing the projects
Projects can be distributed as Python packages to share with your organization and enable data access. Instructions on how to build these Python packages are coming soon. Join our early access program to learn more!